When we bought our «new» Peugeot 807, it came with a webasto engine heater installed. While it was left largely ignored for the first couple of years we had this car, I’ve recently come to see that the webasto can be a rather useful thing to put to use.
However, our only means of controlling the heater was the oval webasto 1533 control unit that is fitted right below the steering wheel. Which is inside the car. Which is not where I tend to be 15 minutes before I want to drive off somewhere. What’s needed is a remote control thingy so that the heater can be turned on without me having to leave the comfort of the couch.
There are several such DIY projects around on the web, indicating that fiddling with this remote is feasible. So I ordered a generic 12V remote control unit from China and waited the usual 30-60 days for it to arrive.
The unit arrived and when hooked up on my workbench (aka. living room dining table) it seemed to work as advertised, except I measured the «static current» (i.e. the power usage while the unit does nothing) to 8.5 mA rather than the advertised 6 mA. My multimeter could be inaccurate, but in any case 1 Ah worth of battery power should last five days, which I hope is acceptable.
One problem remained: The remote controller is simplex, meaning when you sit in your living room and hit the «heater on» button, there’s no way of knowing whether the command was received properly. In fact, since the 1533 unit employs the same button for turning the heater on and off, you might actually turn the heater off when you meant to turn it on and vice versa.
Luckily, the 1533 provides a simple «heater on» output signal. Also luckily, I ordered the two-channel version of the remote control unit. The idea is to have the «heater on» output from the 1533 drive a double-throw relay that activates one of the two remote controller buttons, making one button the «on» button and the other the «off» button. This way, while you still cannot know that the heater was actually turned on, you can hit the «on» button repeatedly without accidentally turning the heater off instead. So to be more specific, the signal from the «on» remote button signal is connected to the NC/normally closed pin of the relay, the «off» remote button signal to the NO/normally open pin, and the remaining «common» pin is then connected to the 1533 button. If you sketch this up you’ll see that once the heater is turned on, the «on» button is deactivated and only the «off» signal will come through, and vice versa.
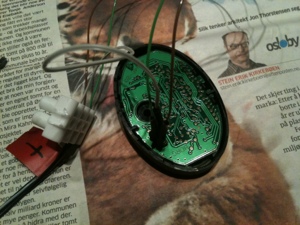
So, on to the practical side of things. The 1533 unscrews easily once the litte cover with the webasto logo is removed. The backside is easily pried off, revealing the back of the unit’s PCB. The modification requires connection to the unit’s ground, +12V, the «heater on» output, and finally the relevant button’s connection (connected to ground when the button is pressed). The former three are all provided on the 1533’s 4-pin connector (the last pin that we don’t use is the W-bus), while the button’s connection has to be soldered directly onto the PCB. The connection point is easily found with a multimeter, and is also displayed nicely on page 30 in this document.
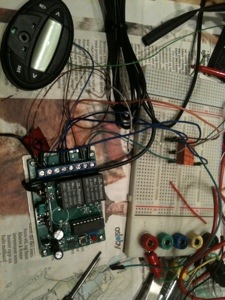
I hooked everything up on my workbench. In the picture below you see the 1533, below that the remote control unit with the two remote-controlled relays, and to the right of that on the breadboard is the extra relay that implements the on/off functionality discussed above. Incredibly, everything worked on the first go!
BTW there was no problem hooking up the 1533 to 12V power and test/operate it just as it was in the car. I.e. it didn’t seem to mind not being hooked up to the W-bus.
I’d recently bought a set of 6-pin xh2-54 connectors. The 4-pin version would have been a better fit obviously, but there was just enough space for this connector to be glued onto the backside of the 1533. In the picture below you can see how this connector sits on the 1533 (I used melting glue here). Also seen is how the orange relay from the breadboard is superglued onto the two relays on the remote control unit, and also the antenna that came with it.
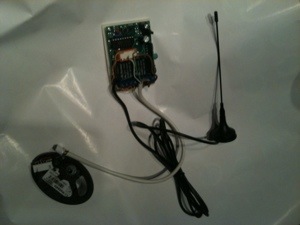
Everything properly hooked up, and it still worked as expected. How strange.
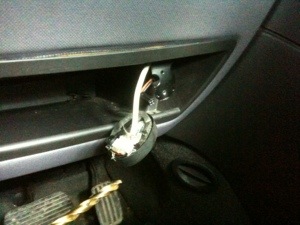
There was just enough of a void to fit the remote control unit and antenna right above the little storage space below the steering wheel where the 1533 was originally installed. I drilled a 10mm hole in the black plastic to fit the wire through, as you can see in the picture below. The whole thing is completely invisible once the plastic edge is seated properly and the 1533 is screwed back onto place.
So far it seems to work perfectly! My only slight worry is that the 8.5 mA might drain the battery too much. Time will show I suppose, but I might install an on/off switch for when I know the car will be left alone for a longer period.
59.944529
10.714818


