Brake switch rebuild

Legg igjen en kommentar

My BMW K75 motorcycle’s front brake light switch (part 61311459569) was failing. I removed it from the bike, and confirmed by multimeter that the switch made no contact whether depressed or not. I tried to wiggle the contacts and spray it with some electronics cleaner, and although I got it working intermittently, I couldn’t really get it to work that way.

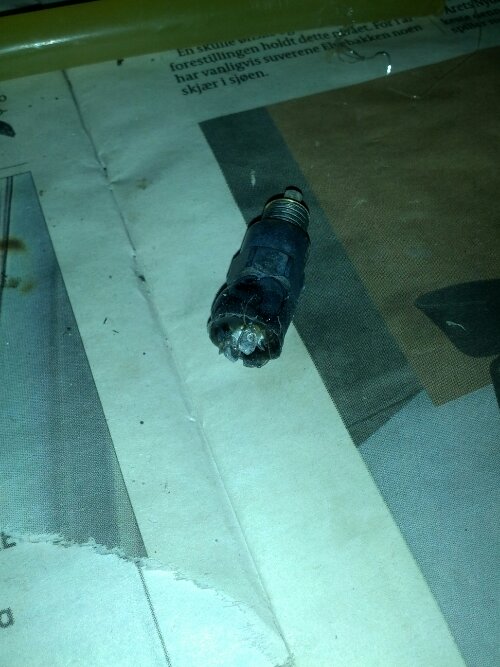
In the end, since a non-working switch is just worthless I determined to make a last ditch attempt: Dismantle the switch completely and then see if I could rebuild it. The problem was that the switch core was mostly set in plastic inside the brass casing, and I was unable to pull it out of there. So I took my propane torch and melted the plastic, leaving just the metal pieces (and the plastic push-rod, thankfully):

image

The way this works is that the brass ring goes onto the thinner end of the plastic pin, which then presses against the spring (the thicker end is the actual switch pin that is pressed against by the brake lever). The two metal contacts press against the brass ring from opposite sides, causing a closed electrical contact. When the pin is pressed, the thick part of the plastic pin takes on the position of the brass ring, breaking the circuit.

Now, the challenge is to put this toghether in a way that will hold up to some wear and tear.

First, I take a piece of plastic tube (a piece of wire insulation) that fits loosely around the spring (this is already in place in the picture above). A tiny piece of plastic (actually a piece of smaller diameter insulation) is superglued into one end to stop the spring from just going through the tube. Now, the two contacts can be superglued onto the tube:

image

In the picture below I’m holding all the pieces in the normally closed circuit position, and you can see both contacts touching the brass ring:

image

In the next picture the pin/button is pressed, and the circuit is broken (which would cause the brake lights to turn on):

image

At this point I take a small piece of epoxy putty and encase the contacts, tube, and spring, such that the whole assembly fits snugly into the brass housing:

image

I then fix the assembly to the housing with superglue (I tried hot-melt glue first, but that didn’t work). Doing this, it was critical to fix the assembly at the correct position such that the switch would be «normally closed» as it should be. Since you can’t look inside the switch to get the positioning correct, I keep the contacts hooked up to a multimeter while gluing. It’s a bit tricky…

Finally, wrap some electrical tape around the outer diameter of the switch housing and fill the gap between the tape and epoxy with black hot-melt glue:

image

Electromechanically this seems to work quite well. It remains to see if it’ll work on the bike and for how long, but I’m hopeful it’ll work for quite some time.

Peugeot 807 sliding door fix

2 kommentarer

The left electric sliding door on our peugeot 807 wouldn’t close. That is, it would almost close and then immediately open up again. We quickly figured out that the door would close properly if we gently pushed it shut at the right moment. A nuisance for the last few months.

A closer inspection and comparison to the non-broken door revealed that the problem was excess play at the top front door roller. Removing the vertical plastic trim on the door that covers the corresponding hinge immediately revealed the cause of the problem: The hinge bracket was loose due to a screw somehow having come undone. The bracket and screw is in the center of this picture:

image

I fastened the screw, and that was it, the door closed perfectly once again.

Sykkellakkering

Legg igjen en kommentar

Naboen har tre gutter litt eldre enn våre. Storebror arvet en av deres sykler, og denne har nå lillebror arvet igjen. Det som sikkert engang var en sprakende rødfarge har med årene falmet til noe som er farlig nær å kunne tolkes som en utilstrekkelig maskulin rosa.

Man kan jo ha en viss sympati med ønsket om en mer fancy sykkel nå som sesongen står for døren. Og siden boden fortsatt er full av spraylakk i det som liksom skulle være fargen til bilen vi ikke har lengre, var det lett å love en overhaling av sykkelfargen.

Jeg har aldri lakkert en sykkel før, men det ble fort klart for meg at man må demontere mer eller mindre hele sykkelen slik at man har kun rammen igjen til lakkering. Demonteringen gikk ganske greit (det viste seg etterhvert at kranken er festet med venstregjenger…), og til juniors store frustrasjon måtte vi så børste, pusse og vaske rammen før den faktisk kunne lakkeres.  Man kan nemlig ikke «lakkere bort» møkka som ligger overalt i kriker og kroker. Her bruker vi en roterende stålbørste på drillen:

image

Vi maskerte vekk hullene til styrelagre og kranklagre med maskeringstape. Så ble det ca. 10-15 runder med spraylakken fra forskjellige vinkler og med 10-15 minutter mellom hvert «strøk». En pappeske fungerte greit som «stativ» og lakkfanger. Det ble også 4-5 runder med klarlakk.

På bildet under er lakkeringen ferdig og jeg har såvidt begynt monteringen igjen med kranken.

image

En «fordel» ved å demontere hele sykkelen er at det er en utmerket anledning til å gå over alle deler og særlig lagre. Selve hjullagrene fettet vi opp i fjor, men nå kunne vi også rense og fette opp kulelagre i krank og styrelager. I tillegg hadde den mekanismen som låser fast selve styret til gaffelen rustet fast, så denne ble banket løs, renset og montert med litt kobberfett. Dermed er det mulig å stille styret i rett høyde også. Vaiere til bremser og gir kunne også smøres skikkelig i demontert tilstand.

Sist men ikke minst ble klistrelappen med storebrors navn og nummer fjernet. Sykkelen ble god som ny, tror jeg, selv om jeg er litt spent på hvordan lakken holder seg.

image